Triggers - Appointment
- Get Started
- Troubleshooting and FAQ
- Release Notes
- Patient Channel
- Triggers
- Technical Specifications
- Patient Facesheet
- Insights & Analytics
- Conversation Flows
- Campaigns
- SMS Basics
- Inbox
- Lines & Resources Requests
- Lines, Events, Resources
- Referrals
- AI Agents
- Add-Ons
- Users and Groups
- Platform Settings and Configuration
- Self-Rescheduling
- Recalls
- Artera Harmony Federal Edition
- Marketplace
Table of Contents
Create a New Appointment Trigger Configure Artera PracticesConfigure FiltersReview Filters Configure Trigger MessagingMerge MessagesSet Appointment Trigger TimingTCPA GuidelinesReview TriggerManaging TriggersFAQsTriggers automate the entire appointment lifecycle, including confirmations, reminders, and follow-ups for cancellations or no-shows. By implementing these workflows, you can reduce manual scheduling tasks, minimize missed appointments, and ensure patients are prepared for their visits.
As an Enterprise User, you can configure Triggers that can be used across your Practices. This functionality allows you to set a standard for your organization controlling both message timing and brand voice.
Create a New Appointment Trigger
-
From the Navigation Bar, select Automations > Triggers.
- Select Create New in the top-right corner.
-
Add a Trigger Name. This will serve as the Trigger's title, so be sure to use consistent naming conventions. Next, leave Appointment selected from the Trigger Module drop-down and determine which Resource this Trigger should be sent from.
Tip: Resource types are Provider, Location, Device, and General. Many customers send by Location Resource.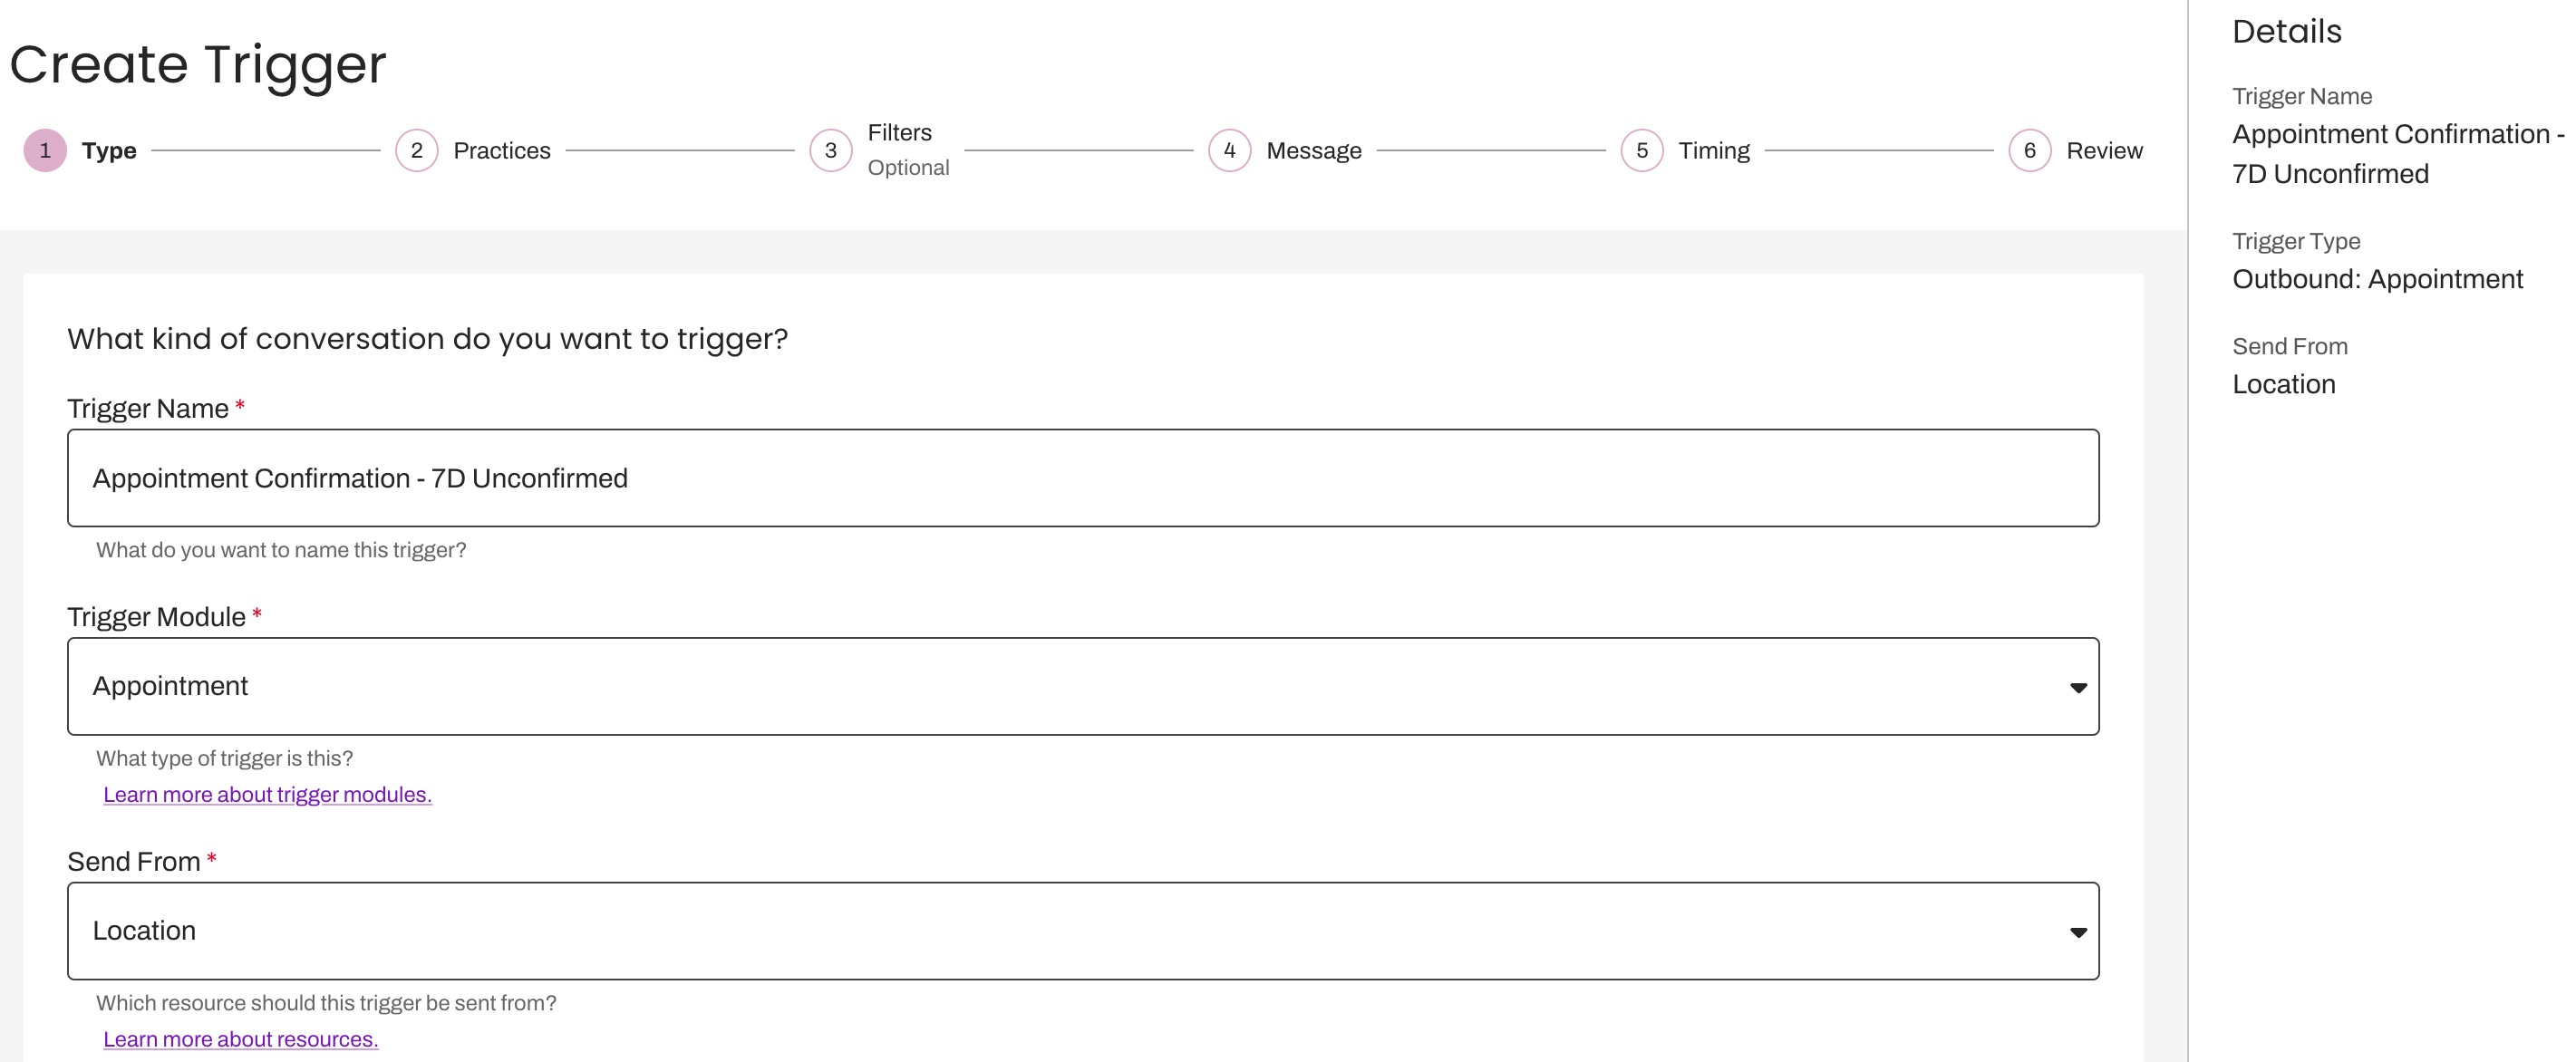
NOTE: As you progress through each step, the Details panel on the right-hand side will update with the Trigger's information.
Configure Artera Practices
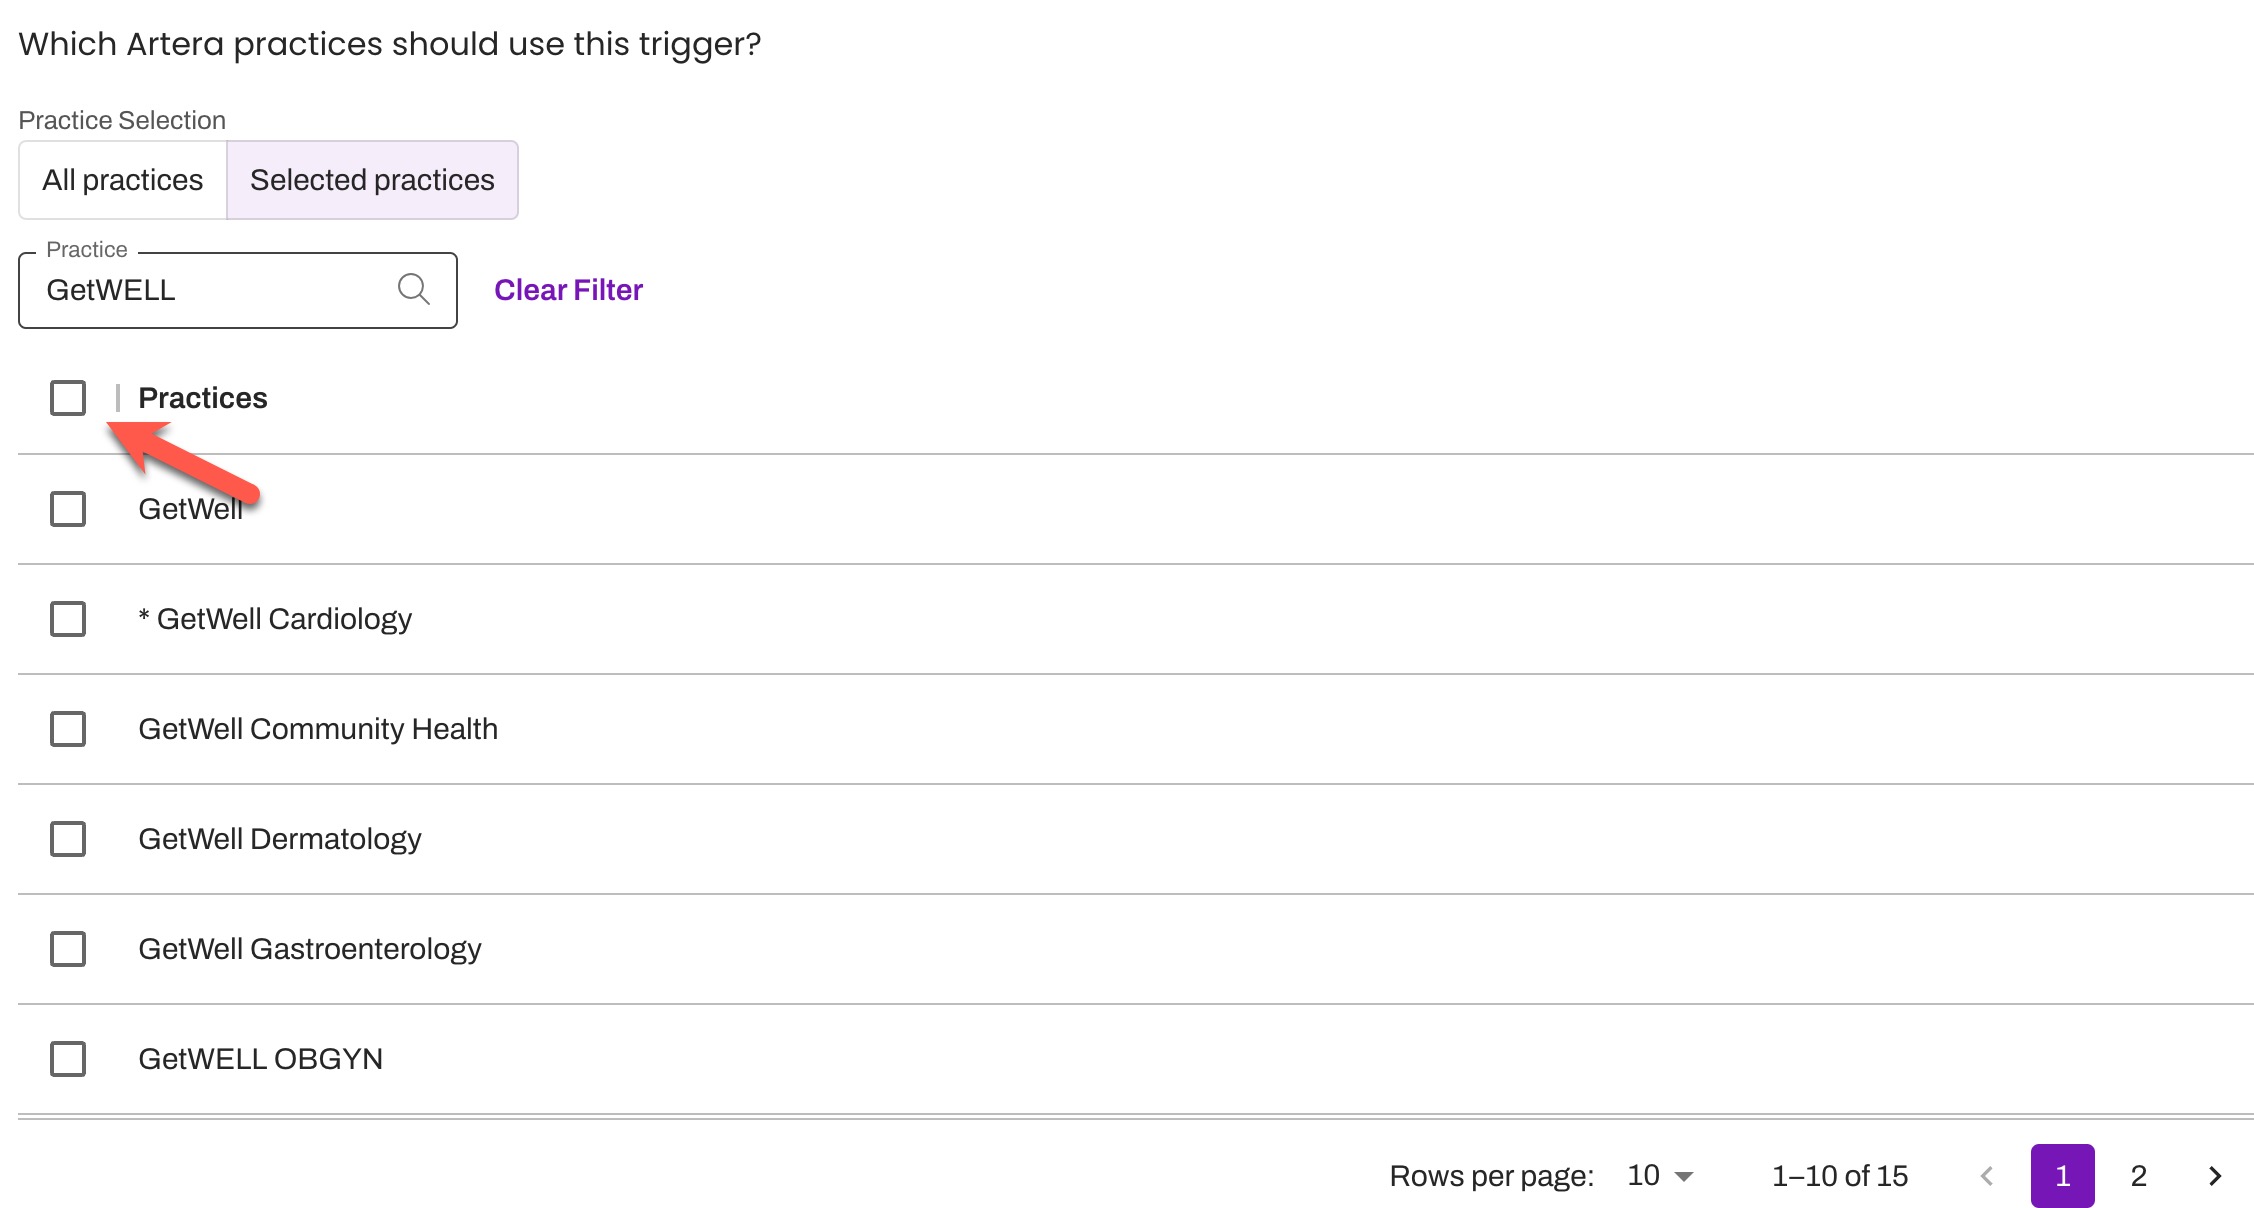
Select the Practices that will send the Trigger. NOTE: By default, all Practices are auto-selected.
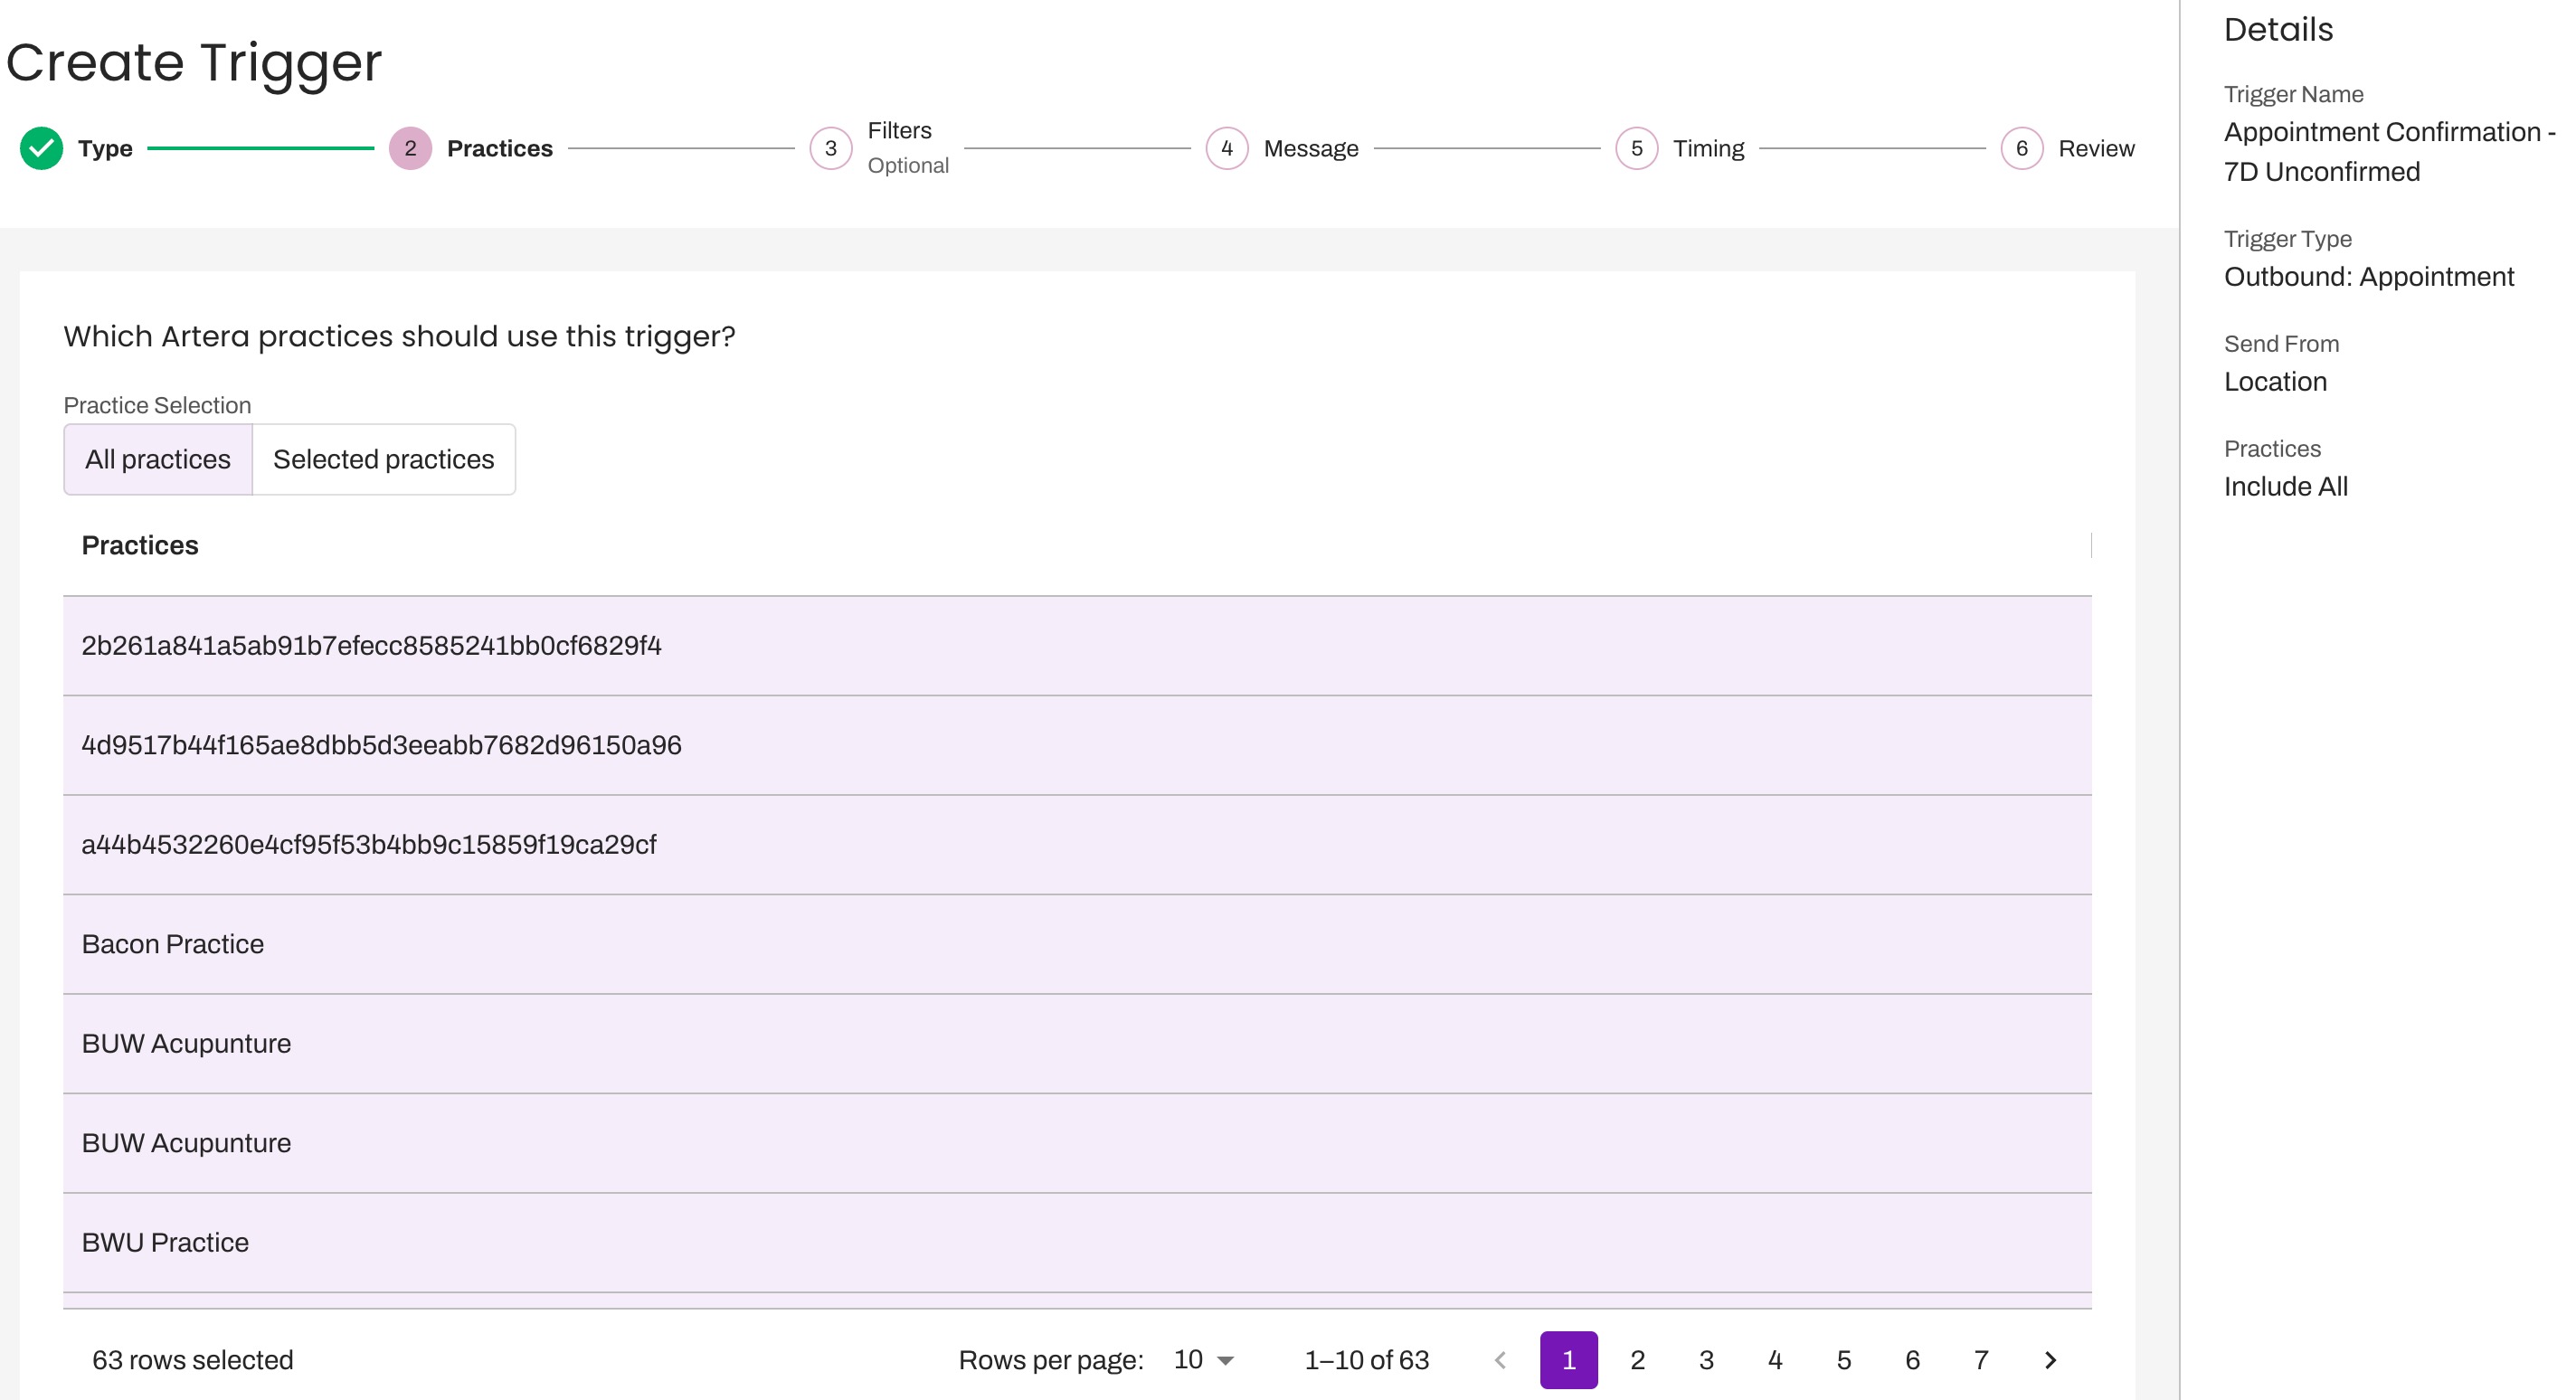
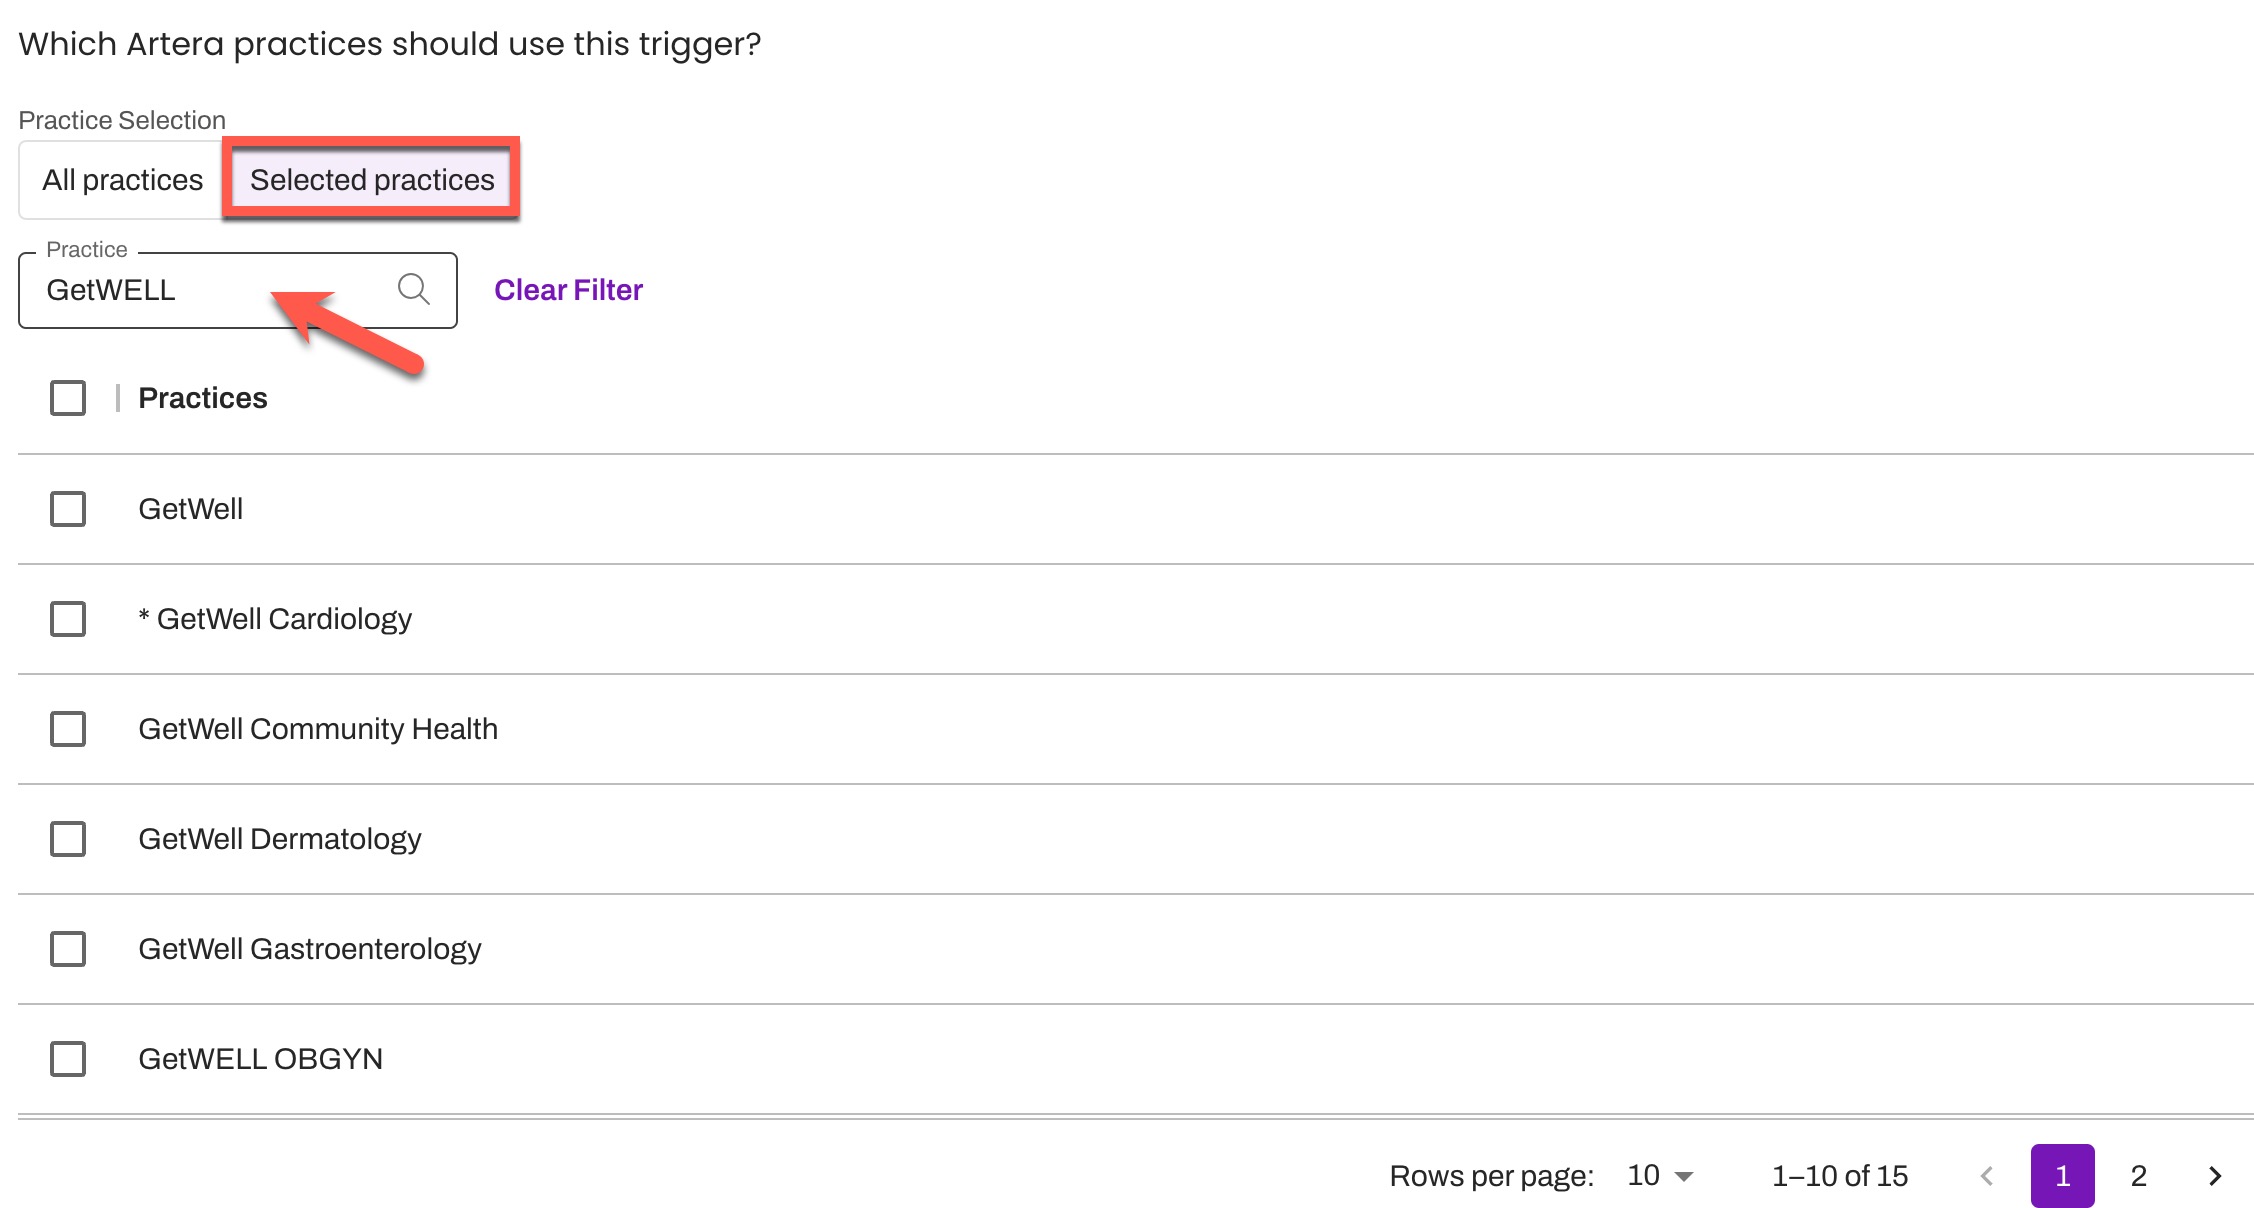
Locate and include Practices by selecting the Selected Practices tab and using the search bar. Simply check the box next to each Practice to add it to the Trigger.
Tip: For larger Enterprises, update the Rows per page to 100 for easier navigation.
To select all search results at once, check the box to the left of the Practices column header.
Configure Filters
Audience
-
Set your Audience filters to specify the patient segment for this Trigger. This ensures the Trigger only activates for patients who meet your defined requirements.
NOTE: By default, if you leave an audience filter field blank, Artera interprets this as "all". For example, if left blank, the "Patient Status" filter will include all Patient Statuses, including "Cancel." To ensure the Trigger is delivered to the correct audience, filter by the appropriate audience fields.
- Visit Method: This is applicable to Epic customers only. If you have implemented Visit Method as an add-on feature, use this option to identify which Visit Method (In Person, Telehealth, or Video) this Trigger is configured for. Tip: Use the radio button for Is to use inclusionary logic or Is Not allowing you to use exclusionary logic.
-
Patient Status: These system-default statuses are mapped to the corresponding statuses in your EMR (Unconfirmed, Cancel, etc). They reflect patient-initiated responses to appointment reminders, such as confirmations. The available statuses are: Cancel, Confirm, Reschedule, Unconfirmed, View.
NOTE: When configuring a Trigger based on a Patient Status of "cancel," ensure that it is not also set to send messages to patients with a System Status of "cancelled." Doing so could result in some patients receiving duplicate messages. - Pre-visit Form Status is: This filter will only be visible to organizations who have implemented the Tonic integration for Pre-Visit Forms. Use this option to identify which status (Complete, Not Complete, Unknown/Other) this Trigger should be configured with.
-
System Status: These appointment-specific statuses are system defaults mapped to the corresponding statuses in your EMR (booked, no-show, etc). They reflect EMR-initiated changes to appointments. For example, when an appointment is marked as "started" in the EMR. The available System Statuses are: Abandoned, Booked, Cancelled, Completed, No-Show, Started.
NOTE: When configuring a Trigger based on a System Status of "cancelled," ensure that it is not also set to send messages to patients with a Patient Status of "cancel." Doing so could result in some patients receiving duplicate messages. - Portal Status: These statuses indicate whether or not the patient is enrolled in your Patient Portal. Portal information is set up during implementation and not all EMRs support sending this data.
- Patient Sex: Segment your patient population based on Sex. You can choose a single option for this filter: Male, Female, or Unknown (where sex is not included or has been omitted).
- Patient Age: Use this filter to include the age of the patient as a restriction. This can be a specified value or an age range.
Event
-
Navigate to the Event tab and select the Events eligible for this Trigger. By default, all Events will automatically be selected.
NOTE: If a Trigger is configured with only one Event and that item gets disabled, the Trigger will have no filters and will send to all patients. It's important to turn the Trigger off if the sole Event associated with it is disabled. Click here to learn about disabling Events.
-
By default, all Events across your Artera Enterprise are selected. To narrow your selection, navigate to the Selected Appointments tab and use the search bar to find specific Events. To select all search results at once, check the box to the left of the Appointment column header.
Tip: For larger Enterprises, update the Rows per page to 100 for easier navigation.
-
Determine if the Event(s) selected should follow inclusionary logic by selecting Include or exclusionary logic by selecting Exclude. In some instances, it may be easier to exclude the Events or Resources that you do not want to send a Trigger to rather than to include all the ones you do. Click here to learn more.

-
By default, all Events across your Artera Enterprise are selected. To narrow your selection, navigate to the Selected Appointments tab and use the search bar to find specific Events. To select all search results at once, check the box to the left of the Appointment column header.
Resources: Provider, Location, Other
-
Select the tab corresponding to the Resource type (Provider, Location, or Other) that you want to filter the Trigger by. The "Other" tab will only display if your Enterprise consists of Device or General Resources.
NOTE: If a Trigger is configured with only one Resource and and that item gets disabled, the Trigger will have no filters and will send to all patients. It's important to turn the Trigger off if the sole Resource associated with it is disabled. Click here to learn about disabling Resources.
-
Provider
-
By default, every provider in your Enterprise included. To filter for specific providers, navigate to the Selected Providers tab. You can search for a provider by name, External ID, or Practice.

- To select all search results at once, check the box to the left of the Provider column header. Tip: For larger Enterprises, update the Rows per page to 100 for easier navigation.
- Determine if the Provider(s) selected should follow inclusionary logic by selecting Include or exclusionary logic by selecting Exclude. In some instances, it may be easier to exclude the Providers that you do not want to send a Trigger to rather than to include all the ones you do. Click here to learn more.
-
By default, every provider in your Enterprise included. To filter for specific providers, navigate to the Selected Providers tab. You can search for a provider by name, External ID, or Practice.
-
Location
-
By default, all Locations across your Artera Enterprise are selected. To filter by specific Locations across your Artera Practices, choose the Selected Locations tab and use the search bar to search for Locations by name, External ID, or Practice.

- To select all search results at once, check the box to the left of the Provider column header. Tip: For larger Enterprises, update the Rows per page to 100 for easier navigation.
- Determine if the Location(s) selected should follow inclusionary logic by selecting Include or exclusionary logic by selecting Exclude. In some instances, it may be easier to exclude the Locations that you do not want to send a Trigger to rather than to include all the ones you do. Click here to learn more.
-
By default, all Locations across your Artera Enterprise are selected. To filter by specific Locations across your Artera Practices, choose the Selected Locations tab and use the search bar to search for Locations by name, External ID, or Practice.
-
Other (Device and General)
-
Determine whether to include or exclude the Device or General Resources. In some instances, it may be easier to exclude the Resources that you do not want to send a Trigger to rather than to include all the ones you do. Click here to learn more.
NOTE: The "Other" tab will only display if your Enterprise has Device and/or General Resources loaded into Artera.
-
Determine whether to include or exclude the Device or General Resources. In some instances, it may be easier to exclude the Resources that you do not want to send a Trigger to rather than to include all the ones you do. Click here to learn more.
-
Provider
How These Resource Filters Combine
The Provider, Location, and Other tabs are all resource filters — they are not independent filter categories. A match on any one included resource type is enough for the Trigger to fire. For example, Include Provider A and Include Location X sends when the appointment matches Provider A or Location X — it does not need to match both.
Excluding a resource type is a separate condition: anyone matching an excluded value is removed, regardless of the include filters.
For full details and worked examples, see the Filter Logic section of the Triggers Filters article.
Review Filters
Before you proceed to the next step, review your filters. Do note that if you selected any Practice that does not contain the Event(s) and/or Resource(s) applied when filtering, that Practice's patients will still receive the Trigger because Practices override Filters. This may result in confusion. Be sure to only select Practices where the Event and Resource filters applied exist. To prevent patients from receiving an incorrect Trigger, remove any selected Practice(s) that do not have these Events and/or Resources.
To identify which Practices should be included:
-
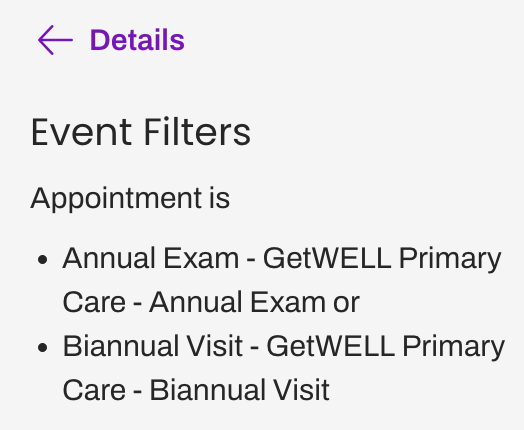
Review the Details side panel and select the "Include #" hyperlink beneath Event Filters and/or Resource Filters.

-
The Practice(s) in which the Event or Resource Filters exist in will display in a bulleted list. The order of information displayed in a bullet is: Event or Resource Filter name, Practice name, Event or Resource External ID.
 NOTE: If there are 100 or more Filters applied to a Trigger, the Details side panel will not display a complete list of Practices that include those items.
.png)
Configure Trigger Messaging
Draft your messages for each supported channel: Text, Call, and Email. For autonomous, two-way voice conversations beyond standard call delivery, learn about Artera Voice AI Agents here. While you can customize content for all three, you only need to complete the methods you intend to use. To learn how to include translations in Trigger messages, click here.
NOTE: Patients will only receive one messages based on their personal communication preferences, even if multiple methods are configured.
We recommend keeping text content short in order to optimize the patient experience. Emails can be longer and require a subject line. Calls should be configured to be more conversational. When a patient receives an automated phone call, they must answer with "hello" or another greeting to prompt the message to begin.
NOTE: Artera uses answering machine detection to listen to the answered greeting of the call and determine whether or not to deliver the message as a voicemail. For more information, click here.
Text messages must be under 1,600 characters, otherwise, the message will fail to send to the patient. Learn more about SMS Character Limits and Message Formatting Guidelines, including how Artera Triggers support multiple languages and attachments.
Quick Responses
Save time crafting your Appointment Trigger's message by leveraging your Enterprise's existing Default-level Quick Responses.
 Attachments
Send attachments to patients including PDFs, images, short videos, and forms. Attachments are helpful in cases where patients require more in-depth information such as detailed peri-procedural instructions before or after their visit. For more information on including attachments in a Trigger, click here.
NOTE: To enhance security, all Trigger attachments are automatically renamed upon upload. For instance, a PDF will be renamed to "application_1.pdf" and this naming convention cannot be modified.

Merge Messages
When a patient has multiple appointments on the same day in the same Practice, use Merge Messages to prevent the patient from receiving duplicates. For example, a "Follow-Up Thank You" Trigger sends for all appointments across providers. If a patient has two appointments on the same day (e.g. a consultation and a biopsy), you can use this functinality to ensure the patient only receives one "Thank You" message. Click here to learn more about Merged Messages.
Configuring Merged Messaging
To enable Merge Messaging, select the Yes radio button. A new template field will appear for your Merged Message copy.
NOTE: If your Trigger uses multiple delivery methods (e.g., Text and Email), you must provide Merged Message copy for each method before proceeding.
NOTE: Merged Messages are only available in the languages already configured for your original Trigger message. To add a new language to a Merged Message, you must first add that translation to the primary Trigger message.
Merge Messages Considerations
You cannot merge multiple distinct Triggers. For instance, if one Trigger is set up to send a reminder for Dr. Jacobson and a second Trigger sends reminders for Dr. Smith at a separate Practice, the patient would still receive two messages: one for Dr. Jacobson and one for Dr. Smith.
Triggers that are configured to send from different lines can be merged as long as they are in the same Practice.
- Merge Messaging is based on the individual patient, not the phone number. If multiple patients share a single contact number (e.g., family members), their notifications will not be merged. Each patient will receive their own distinct message, even if they have identical appointment types on the same day.
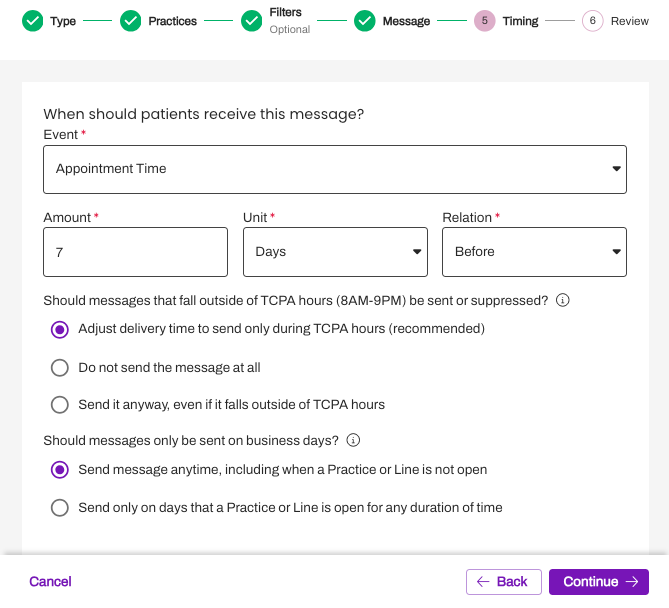
Set Appointment Trigger Timing
Next, determine when the Appointment Trigger should be sent to the patient (e.g. 2 Days Before the appointment, 4 Hours After the appointment, etc.).
Appointment Triggers consist of six message events, each with specific send rules (see below). For two of these events—, Appointment Time and Appointment Created, you can configure a custom time offset to determine exactly when the message is delivered.
Click here for leading practice recommendations on Appointment Trigger timing.
 Appointment Triggers
- Appointment Time: Send the Appointment Trigger based on the patient's scheduled appointment time (e.g. Send reminder 1 Day Before Appointment Time). So, if the patient has a 2:30PM appointment, the 1 Day Reminder will go out at 2:30PM the day prior to the appointment.
- Appointment Created: Send the Appointment Trigger based on the appointment being created in your EMR. The Trigger will send once the integration message is received in Artera (e.g.: send Instant Booking 15 minutes after Appointment Created).
-
System Status Change: Send the Appointment Trigger to the patient based on the status of the appointment being updated in the EMR (e.g. send a message when the System Status changes from "Booked" to "Cancelled"). During implementation, your EMR statuses are mapped to the corresponding default Artera statuses. When configuring a Trigger to support System Status Changes, the available "From Statuses" are: Abandoned, Booked, Completed, No-Show, and Started. The available "To Statuses" are: Abandoned, Booked, Cancelled, Completed, No Show, and Started. NOTE: When configuring a Trigger to send to patients based on System Status of "cancelled," ensure that the Trigger is not also configured to send to patients with a Patient Status of "cancelled." Doing so could potentially cause some patients to receive duplicate messages.
- NOTE: Since your EMR may not be able to send all of these statuses to Artera, only the supported statuses will be mapped.
- Date or Time Change: Send the Appointment Trigger to the patient if the date or time of the appointment is changed (e.g. appointment was rescheduled to a different day). This will only be sent if your integration can send these values to Artera and if the original appointment was updated. If you cancel the appointment in your EMR and schedule a new one, Appointment Triggers configured with the 'Date or Time Change' event will not be sent. Learn more here.
- Location Change: Send the Appointment Trigger to the patient if the Location of the appointment is changed (e.g. appointment was moved to a different facility due to renovation). This will only be sent if your integration can send these values to Artera and if the original appointment was updated. If you cancel the appointment in your EMR and schedule a new one, Appointment Triggers with the "Date or Time Change" event will not be sent. Learn more here.
-
Patient Status Change: Send the Appointment Trigger when the patient's appointment status changes in Artera (e.g. send a message when the Patient Status changes from "unconfirmed" to "confirmed.") This change can occur when the patient responds to an appointment reminder or when a user updates the appointment status on the Patient Facesheet. NOTE: If you are configuring a Trigger to send to patients based on Patient Status of "cancelled," ensure that the Trigger is not also configured to send to patients with a System Status of "cancelled." Doing so could potentially cause some patients to receive duplicate messages.
- Tip: When using Patient Status Change, we recommend selecting all statuses available in the "From" column. So, if you want the Appointment Trigger to send to the patient immediately any time a patient’s appointment status moves to the status of confirmed, you will need to include all available "From" statuses (View, Cancel, Reschedule, Unconfirmed). Otherwise, if an appointment moves from unconfirmed > view > confirmed, it would inadvertently be excluded from the Trigger.

- Tip: When using Patient Status Change, we recommend selecting all statuses available in the "From" column. So, if you want the Appointment Trigger to send to the patient immediately any time a patient’s appointment status moves to the status of confirmed, you will need to include all available "From" statuses (View, Cancel, Reschedule, Unconfirmed). Otherwise, if an appointment moves from unconfirmed > view > confirmed, it would inadvertently be excluded from the Trigger.
Send Only on Business Days?
This rule is only available for "Appointment Time" or "Appointment Created" Triggers.
NOTE: This setting is only available if the Appointment Trigger is scheduled to send at least 15 minutes after the chosen message event. Otherwise, the option will be grayed out and cannot be enabled.

Business Days are determined by your Practice and line Hours. Any day that your Practice or line is open for any duration of time counts as a Business Day in Artera.
Impact
If you restrict an Appointment Trigger to send only on Business Days and the message is set up to send 1 Day Before the Appointment, appointments that fall directly after the weekend will receive their reminders during your last business day.
For example, if your Practice is closed on Saturday and Sunday, reminders for Monday's appointments will be sent the Friday before the appointment rather than on Sunday.
Note: In Practices set up for One-Way messaging, all days are Business Days, so this toggle does not impact your Appointment Triggers.
Patient Status or System Status Change Ignores Business Hours
If you configure the Appointment Trigger to occur upon the message events of "Patient Status Change" or "System Status Change" (e.g. Appointment Confirmed), the Appointment Trigger will go out regardless of Business Days. Instead, the timing of the message depends on when your system of record sends status updates to Artera.
For EMRs that send information in real-time, the message will go out when the patient responds to the Appointment Trigger's message, changing the status. For systems that complete a batch update once per day (typically overnight), we recommend avoiding using the System Status Change trigger when building Appointment Triggers.
For example: If Artera does not receive a No-Show status until after midnight, instead of creating a No-Show Appointment Trigger that uses a "System Status Change" from "Booked" to "No-Show", we would configure it to send 1 Day After Appointment Time. Then, when filtering at the Practice, we would add a System Status Restriction of "No-Show".
Suppress Conversation for same-day appointments?
When using the "Appointment Created" message trigger, you can choose to not send the patient an Instant Booking message for their same-day appointment.

TCPA (Telephone Consumer Protection Act) Guidelines
Artera enables you to send or suppress automated reminders based on TCPA guidelines. Choose between sending the message immediately, scheduling the message within the TCPA guidelines, or not sending the message at all. Click here for a full breakdown of TCPA Hours and how it impacts messaging.

When considering Appointment Triggers, we typically recommend choosing to Adjust Delivery Time when available, which will respect TCPA hours.
Generally, most appointments fall within standard business hours, so that adjustment is typically minimal. For example, if the patient is receiving a reminder for their 7:30 AM appointment on Tuesday, the 1-Day Reminder will send around 8:00 AM on Monday.
Review Trigger
Review the details of the Appointment Trigger, ensuring all of the information is correct. To make changes, use the Back button to navigate through the Trigger steps.
Tip: To review the Trigger in different languages, use the drop-down menu located under the Message section.
Select Create to finish creating the Appointment Trigger or Create and Turn On to finish creating the Appointment Trigger and allow it to start sending messages to patients.
Managing Triggers
It is important to have an Appointment Trigger strategy to ensure that your Triggers stay up to date over time.
Editing a Trigger
As an Enterprise user, you can edit Appointment Triggers so that the Triggers are updated for all Practices that use them:
Navigate to Triggers.
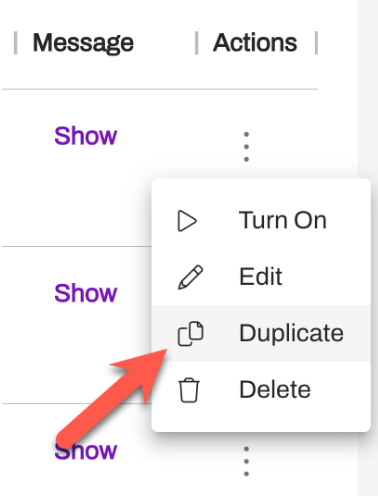
Select the Appointment Trigger you wish to edit by clicking its three-dot Actions menu on the right side and choose Edit.
Change desired section: Trigger Type, Trigger Content, Trigger Timing, or Trigger Aggregation.
Select Update when done to save your changes.
Creating Triggers From Template
You can create Triggers and then use them as a template for new Triggers that have similar functionality.
This is especially helpful when creating Event-specific Triggers, e.g., copying the Appointment Confirmation - 7D Unconfirmed to use for the Virtual Visit Confirmation - 7D Unconfirmed.
Navigate to the Actions menu of the Trigger you would like to copy by clicking the (...) Actions menu. Select Duplicate.
Edit the appropriate sections.
Once you have reviewed your Trigger, select Create or Create and Turn On.
FAQs
I do not see an existing Event, Location, Provider, or General Resource as part of my results under Filters, what do I do?
Make sure that you have included the Practice where those Events or Resources are located. Events and Resources will only show for the Practices you have selected during step 2 of the Trigger's configuration.
If you have included the right Practices, reach out to your Customer Success Representative for further assistance.
I created an Appointment Trigger, do I need to navigate to the Practice-level to enable it?
All Triggers are centrally located and managed through Triggers. Only Enterprise Users can enable Triggers.
If a patient's appointment is cancelled in the EMR, will an Appointment Trigger be delivered to the patient?
No, an appointment cancelled through the EMR will not send an Appointment Trigger to the patient. The cancellation must be initiated by the patient, with the use of cancellation keywords, through a cancellation response to an Appointment Trigger message.
A patient's appointment was rescheduled in the EMR. Will new Appointment Triggers be delivered to the patient?
If a new appointment was scheduled for the patient with a new appointment ID, a new set of Appointment Triggers will be delivered to the patient. However, if a patient's existing appointment is modified or rescheduled in your EMR using the same Appointment ID, Artera has the ability to send Triggers communicating this change based on specific scenarios. Click here to learn more about Appointment IDs and Rescheduling.
If a Resource (Provider, Location) or Event used in a Trigger's filters is disabled, does the Trigger automatically stop including patients associated with that item, or does an Enterprise User need to manually remove it from the Trigger?
If the Resource or Event is disabled in Artera, any Triggers filtering by that item will automatically remove it from their filters.
NOTE: If a Trigger is configured with only one Resource and/or Event and that item gets disabled, the Trigger will have no filters and will send to all patients. It's important to turn the Trigger off if the sole Resource or Event associated with it is disabled.