Practice Automations - Appointment
- Get Started
- Release Notes
- Triggers
- Patient Channel
- Troubleshooting and FAQ
- Patient Facesheet
- Technical Specifications
- Insights & Analytics
- Inbox
- Conversation Flows
- Campaigns
- Lines & Resources Requests
- Lines, Events, Resources
- SMS Basics
- Automations
- Referrals
- AI Agents
- Add-Ons
- Users and Groups
- Platform Settings and Configuration
- Self-Rescheduling
- Recalls
- Marketplace
- Artera Harmony Federal Edition
Table of Contents
Configure Default AutomationIdentify Send ResourceAdd RestrictionsRestriction LogicAttachments and FormsCreate Practice-specific AutomationStart AutomationsManaging AutomationsEditing a Practice AutomationCreating Automations From TemplateAppointment Automations allow you to build automatic appointment reminders, appointment confirmations, and no-show/cancellation workflows. These Automations are designed to reduce appointment management overhead, decrease no-shows, and increase patient preparedness.
Appointment Automations are generally created at the Enterprise and configured for each Practice within the Practice Automation section. This allows you to use the same reminder cadence and messaging throughout multiple Practices, allowing for easier message management and preventing duplicates.
Automations can also be created just at the Practice, typically when a specific reminder cadence or unique messaging is needed. These Automations will only be available for use within the Practice they are created in.
Page Overview
Automations in grey are Default Automations, Automations in white are Practice Automations.

- Create Automations: Click this button to build a new Practice-specific Automation.
- Paused: This tab contains all Default Automations that have not been configured and all Practice and Default Automations that have not been started or paused.
- Running: This tab contains all active Automations for the Practice.
- Expand SMS Text: Click this link to preview the Automation's text message content. Note: This does not display any translations added to the Automation.
- Description: This is established when creating the Automation and serves as the Automation's title.
- From: The Resource type the Automation is sent from (Location, Provider, etc.). This varies based on how your Practice has its Lines configured. Click here for more information.
- To: The Restrictions that have been put into place to determine which patients will receive the message.
- When: This indicates when the Automation will be sent.
- Msgs Sent: This is the number of messages sent by the Automation. This value resets within a 24-hour period of the last automated message that was triggered.
-
Send Via: The icons display which message types the Automation can be sent by: Text, Call, and/or Email.
-
The color of the SMS icon indicates message length:
- Green: less than 160 characters
- Black: 161+ characters
-
The color of the SMS icon indicates message length:
- Form: The name of the Form attached to the message. Click here to learn more about Artera Forms.
Configure Default Automation
This section focuses on configuring Default Automations for the Practice. Click here to learn how to build a Default Appointment Automation.
- Navigate to Practice Settings > Automations.
- Open the Paused tab.
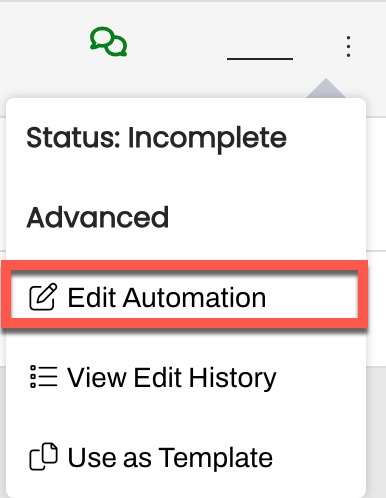
- Click the (...) menu for the Automation you want to enable. You will notice that the Automation has a status of Incomplete. Until the Automation has been configured, you will not be able to start it.
- Click Edit Automation.
Identify Send Resource
Select from which Resource the Automation should be sent. Resource types are Provider, Location, Device, and General. Many clients send by Location Resource.
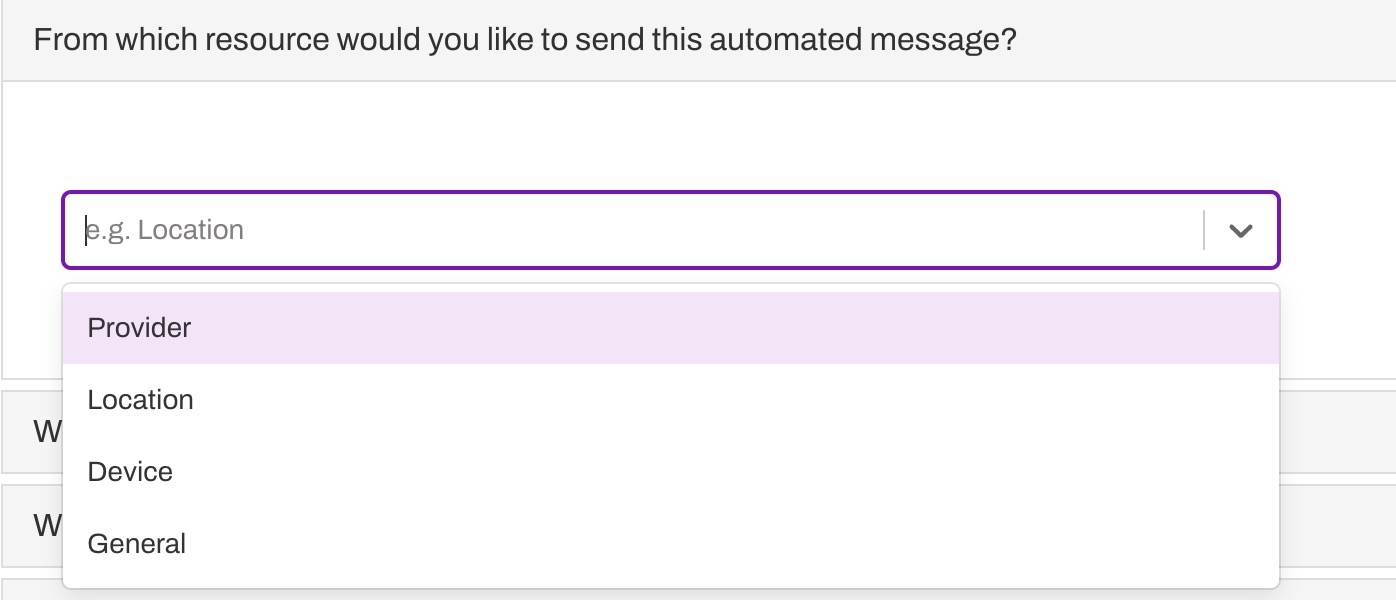 Make sure the Resource(s) are connected with a Line. If you choose a Resource that has not been added to a Line, the Automation will not be sent. Tip: Not sure how your Lines are configured? Navigate to Practice Settings > Lines and review the Resources added to the Line.
Add Restrictions
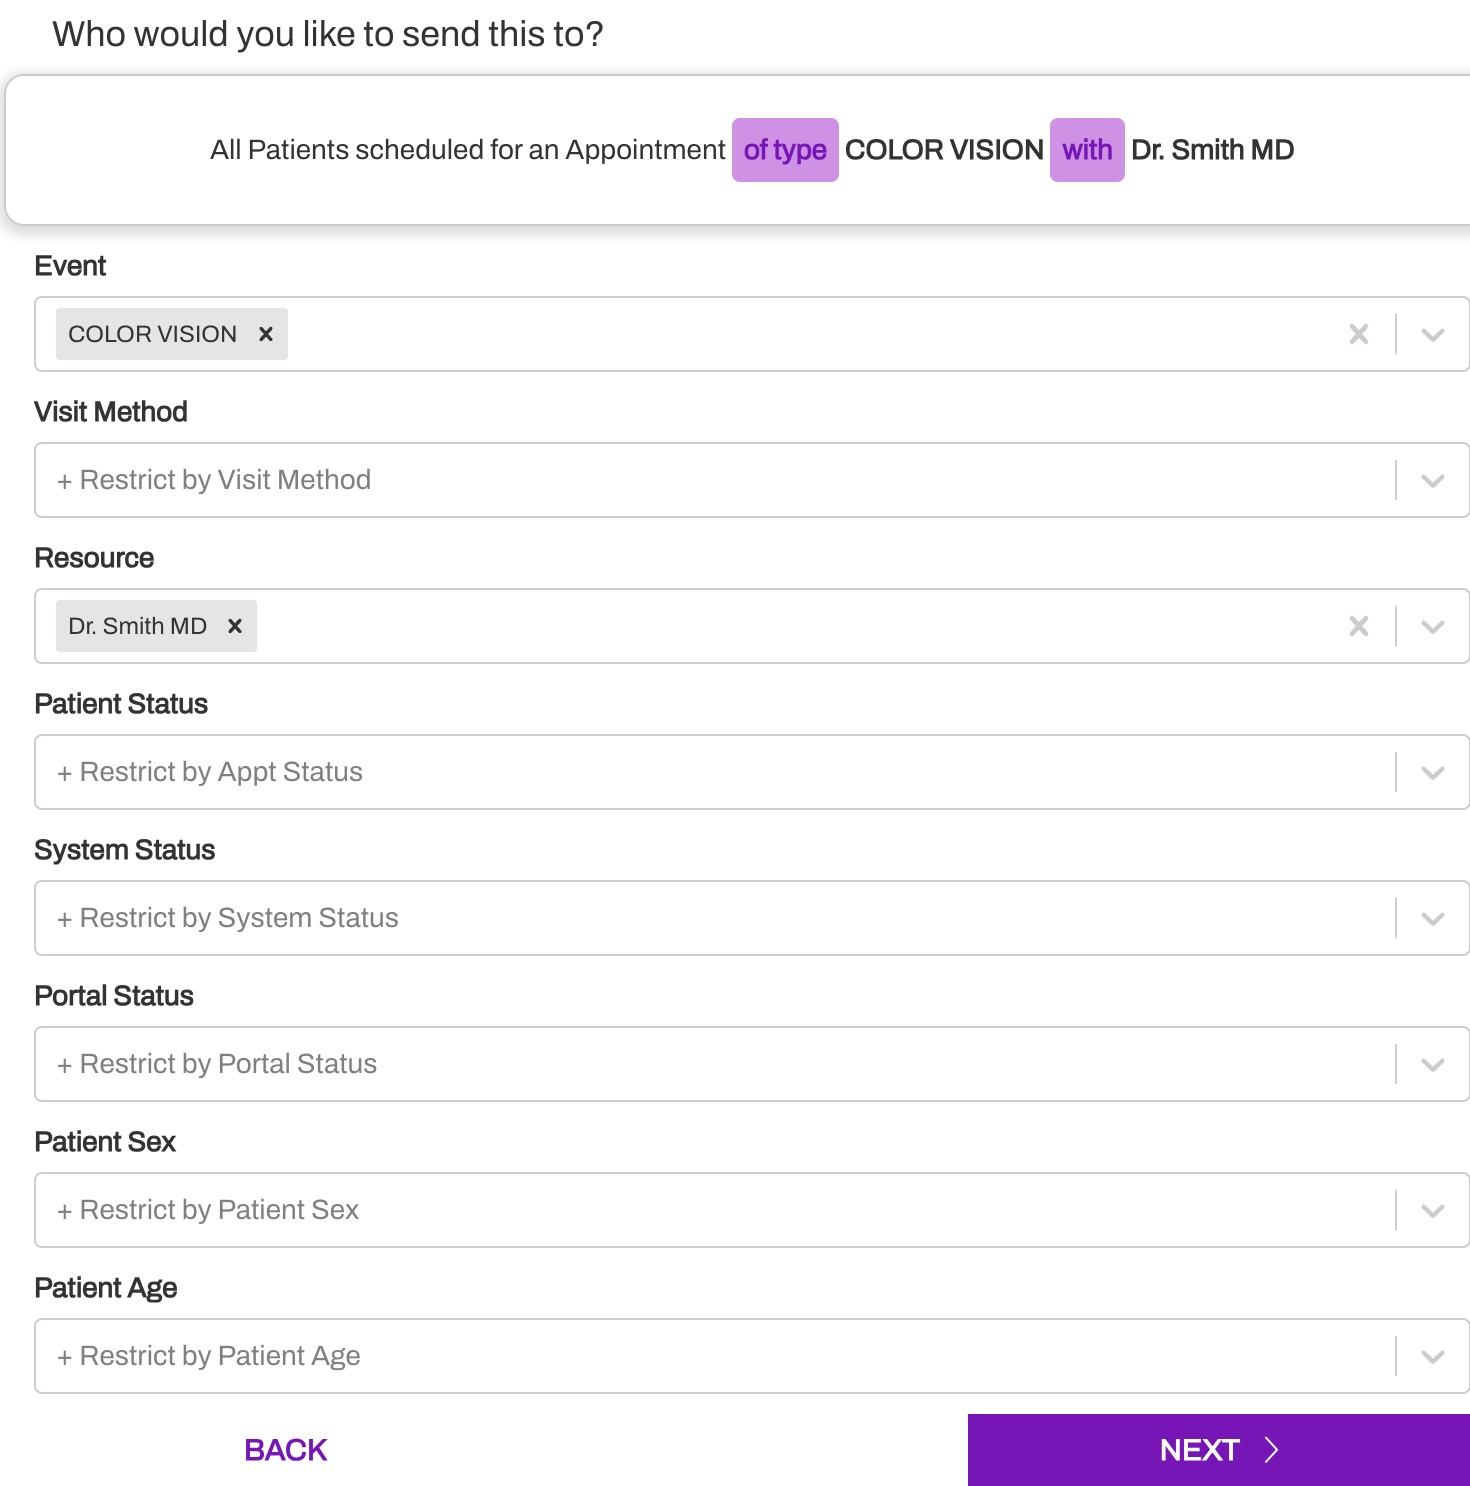
Restrictions specify who should receive this Automation. Use the following Restriction filters to ensure the message is sent to the right audience.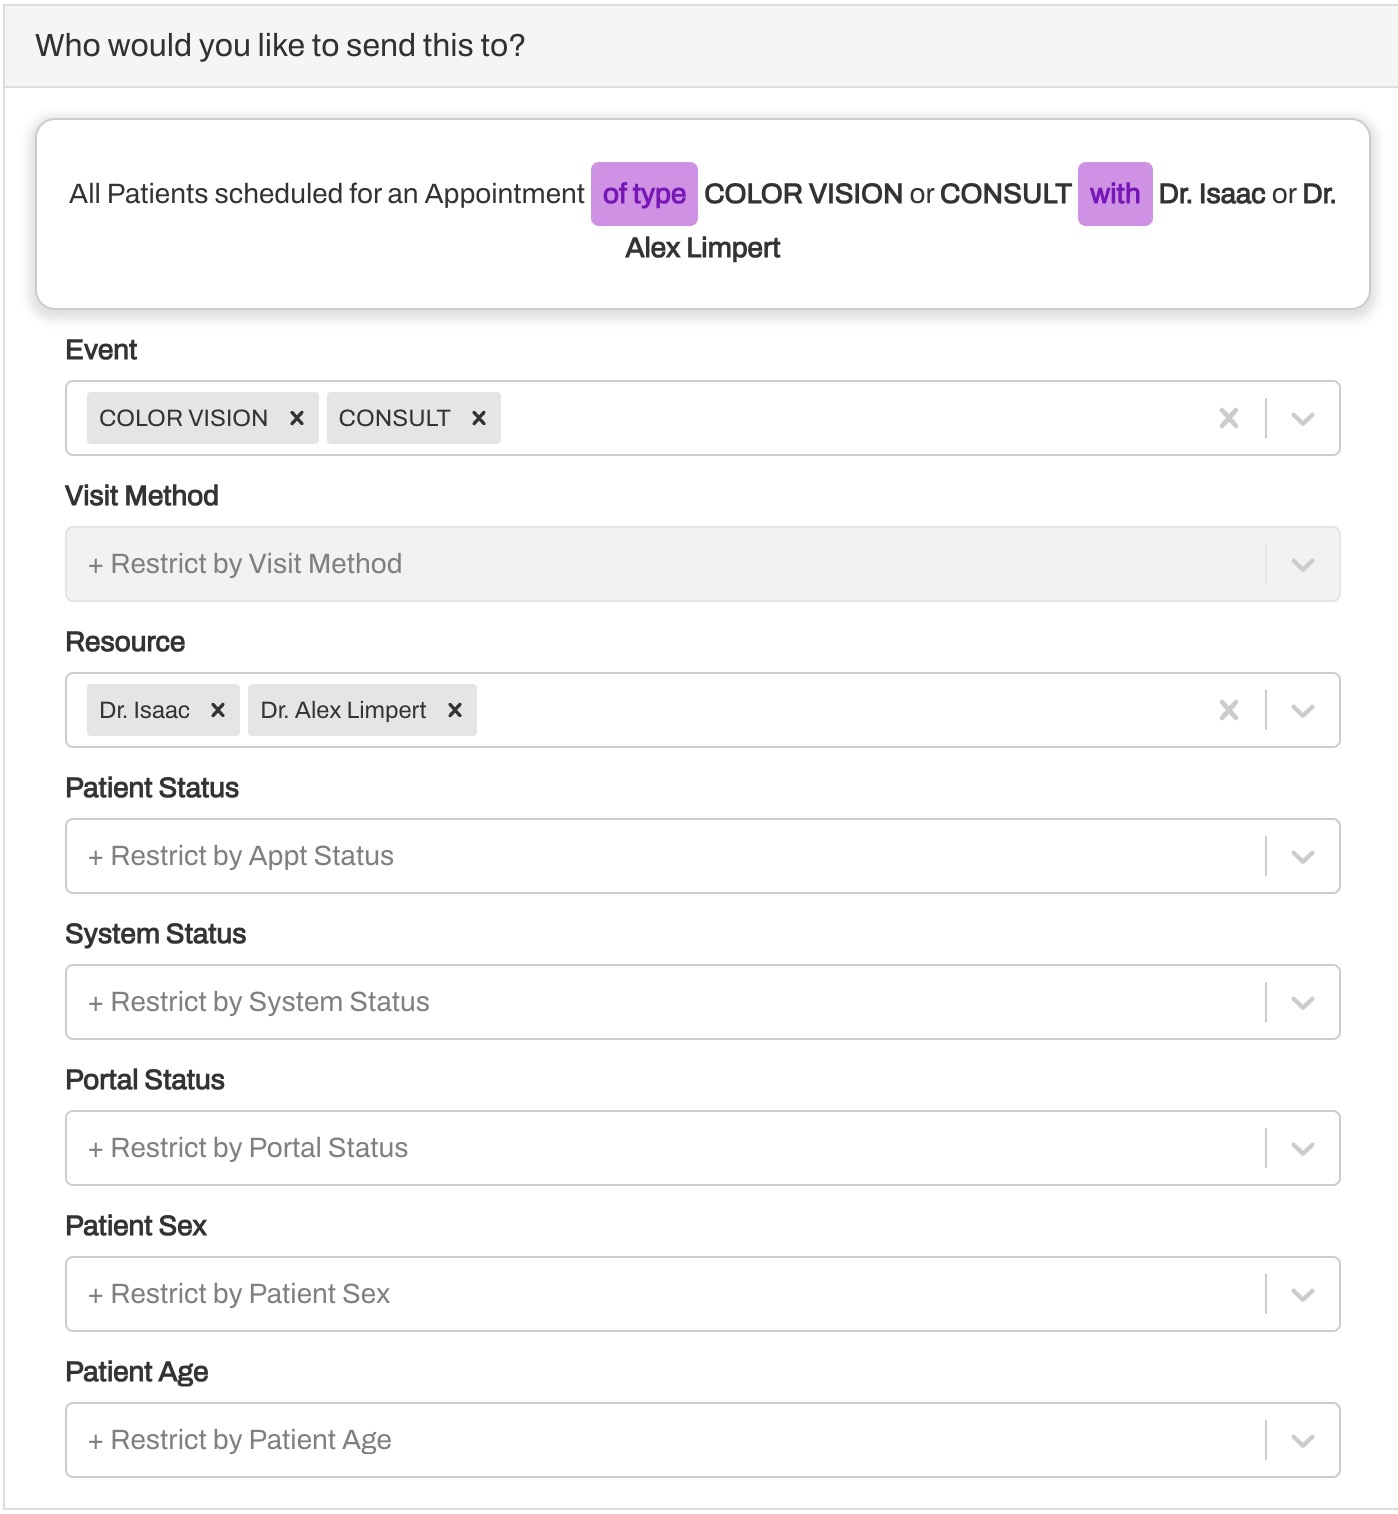
- Event: These are mapped directly to Events within the Practice. NOTE: If an Automation is configured with only one Event and that Event gets disabled, the Automation will send to all patients. Therefore, it's important to ensure that you pause the Automation if the Resource associated with the Automation is disabled. Click here to learn more about disabling Events.
- Visit Method: This restriction is configured at the Default level and applies to customers who have implemented the Visit Methods functionality.
- Resource: These are the Locations, Providers, Devices, and General resources within the Practice. NOTE: If an Automation is configured with only one Resource and that Resource gets disabled, the Automation will send to all patients. Therefore, it's important to ensure that you pause the Automation if the Resource associated with the Trigger is disabled. Click here to learn more about disabling Resources.
- Patient Status: These statuses are system defaults that have been mapped to the corresponding statuses in your system of record (unconfirmed, cancel, etc.)
- System Status: These appointment-specific statuses are system defaults that have been mapped to the corresponding statuses in your system of record (booked, no show, etc.)
- Portal Status: These statuses indicate whether or not the patient is enrolled in a Patient Portal. Portal information is set up during implementation and not all EMRs support sending this data.
- Patient Sex: Segment your patient population based on Sex. You can choose a single option for this filter: Male, Female, or Unknown (where Sex is not included or has been omitted).
- Patient Age: Use this filter to include the age of the patient as a restriction. This can be a specified value or an age range.
Restriction Logic
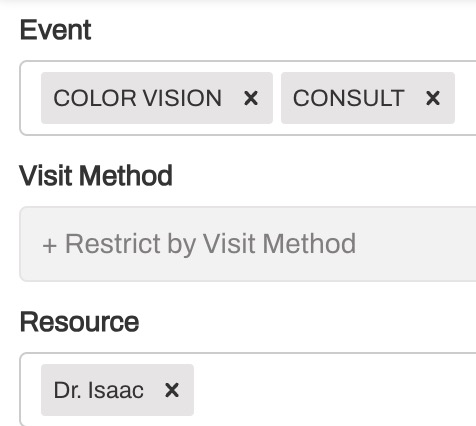
The Restriction filters apply default logic. The logic between Restriction sections (i.e. Events and Resources) apply and logic. Meaning that the appointment must qualify for both the Event and the Resource restriction in order to receive the message. The logic within Restriction sections (i.e. all Event types selected) apply or logic. Meaning that the appointment must be one of the Event types listed in order to receive the message.
In the following example, the patient must have an appointment scheduled with an Event Type of Color Vision OR Consult AND the appointment must be scheduled with the Provider of Dr. Isaac.
Restriction Statement
The Restriction Statement at the top of the page helps you conceptualize who the Automation will be sent to. The following example shows the recommended configuration for the Appointment Confirmation - 2 Day Unconfirmed Automation.

Here, we can see the message is set up to send to all patients for an appointment of type Color Vision or Consult with Dr. Isaac (Provider), who have not confirmed their appointment, and who have a system status of Booked.
Exclusions
In some instances, it may be easier to exclude the Events or Resources that you do not want to send an Automation to rather than to include all the ones you do. Text within the purple boxes can be clicked on and changed from an inclusive (of type/with) to an exclusive (not of type/not with).
For the following example, we want the Automation to send to all Events except Color Visions or Consults because we have a special confirmation message specific to these Event Types. Additionally, we can also update the with filter to indicate NOT with if we would like to exclude that specific Resource (Dr. Isaac, in this case).

-
Select the Event or Resource that you would like to exclude.
- Click the purple of type and it will become NOT of type (Event)
- Click the purple with and it will become NOT with (Resource)
- Complete other restrictions as needed. The exclusions set above will not apply to any other restriction such as Patient Status or System Status.
Attachments and Forms
The Automations message language is established in the Default build. However, you can add Attachments and Forms specific to your Practice, as needed.
Note: Merged Messages cannot support Attachments or Forms. If the message indicates it can be merged (check out the Would you like to merge similar messages section), do not include Forms or Attachments.
Media Attachments
You can include rich media along with automated messages to your patients. Attach campus maps, PDF files with instructions, and more. We recommend all attached media is under 500KB in size to preserve performance. Click here to learn more.
Attach a Form
If you would like to send an Artera Form along with the Automation, you can select which Form should be sent at the Practice level. To better understand forms, read about Satisfaction Forms.
Create Practice-specific Automation
- Navigate to Practice Settings > Automations.
- Click + Create Automation in the upper right-corner.
-
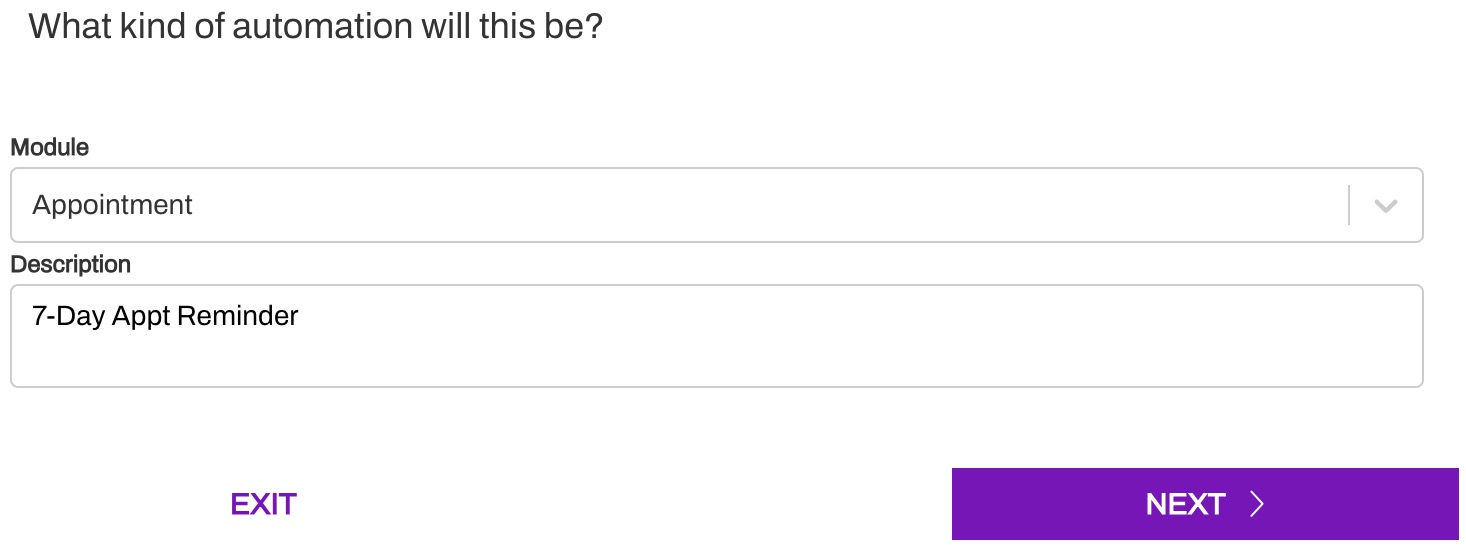
Leave Appointment selected from the Module drop-down and add a brief Description. This is how you will identify the Automation going forward, so be sure to use consistent naming conventions.
-
Indicate the desired Resource. Location is most common, but we recommend verifying how you have set up your Lines to confirm. For instance, if your Practice's Lines are allocated by Provider, choose Provider instead.

-
Determine who should receive these Automations by leveraging Restrictions. Click here to learn more.
-
Add your Appointment messaging. Click here for a deep dive into crafting a message to support your team. Add Attachments or Forms, as needed.

-
Determine when this Automation should be sent. Click here for a deep dive on timing options.

-
Determine if you would like to merge similar messages for patients with multiple appointments on the same day. Click here to learn more about Merged Messaging.

-
Review your Appointment Automation. Click Create Automation to save.

Start Automations
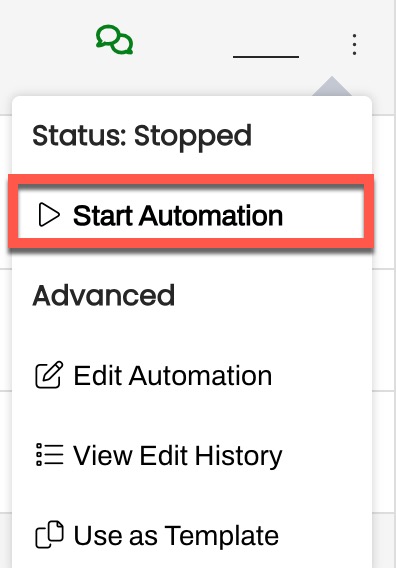
When the Automation setup is complete, the Automation is automatically Paused, meaning the Automation is not sending any messages. To enable the Automation, go to the Paused tab on the Automations, click on the (...) menu and select Start Automation. The Automation will then be activated and moved to the Running tab.
Managing Automations
It is important to have a strategy to ensure that your Automations stay up to date over time. Click here to learn more.
Editing a Practice Automation
- Navigate to Practice Settings > Automations.
- Select the Automation you wish to edit by clicking (...) menu and choosing Edit Automation.
- Select Update when done to save your changes.
Creating Automations From Template
You can use Default or Practice Automations as Templates, allowing you to quickly create new Automations that have similar functionality. This is especially helpful when creating Event-specific Automations, e.g., copying the Appointment Confirmation - 7D Unconfirmed to use for the Virtual Visit Confirmation - 7D Unconfirmed.
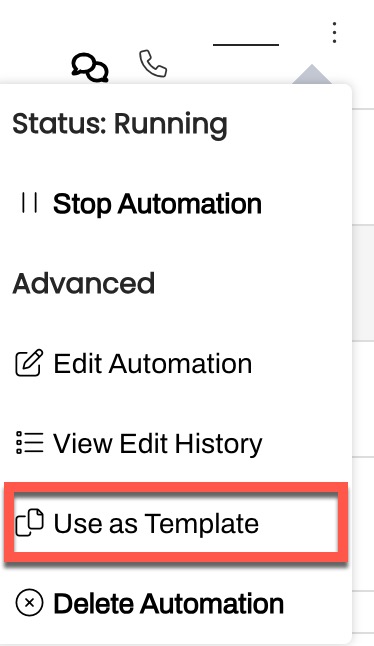
- Go to the Action Menu of the Automation you would like to copy by clicking its (...) menu. This can be done for Paused or Running Automations. Select Use as Template.
- Edit the appropriate sections.
- Once you have reviewed the Automation, click Create Automation.