How to Add a New Practice
- Get Started
- Troubleshooting and FAQ
- Release Notes
- Patient Channel
- Triggers
- Technical Specifications
- Patient Facesheet
- Insights & Analytics
- Conversation Flows
- Campaigns
- SMS Basics
- Inbox
- Lines & Resources Requests
- Lines, Events, Resources
- Referrals
- AI Agents
- Add-Ons
- Users and Groups
- Platform Settings and Configuration
- Self-Rescheduling
- Recalls
- Artera Harmony Federal Edition
- Marketplace
Practices contain Locations, Providers, and Events that are mapped from your EMR to Artera and include at least one line to send messages.
To add a new Practice, complete the following steps:
- Create New Practice in Demo and Production.
- Add line(s), if applicable.
-
Submit new Lines & Resources requests to Artera Support:
- Sign Letter of Authorization (LoA)
- Verify Resources Display in Practice
- Verify Events Display in Practice
- Configure Triggers.
- Add Resources to new lines.
-
Configure Practice Settings:
- Add users to the Practice
- Review Practice Settings
- Review Practice Holiday Hours
Review the steps in detail below to learn more about the process for adding a new Practice to your existing Enterprise in Artera:
.png)
Step 1: Create New Practice in Demo and Production
In your Artera Demo environment, navigate to Settings > Enterprise Settings > Practices.
NOTE: Only Enterprise Users can create new Practices.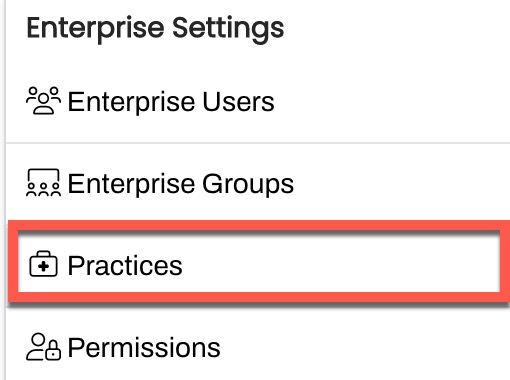
Select + Add Practice.
Enter the Name, Timezone, and Specialties (optional).

Select Save Practice.
Repeat this process in your Artera Production environment.
Step 2: Create New Line(s)
Add the line(s) to the Practice prior to the Artera Support team enabling the line. Click here to learn how to add new lines.
NOTE: If you want to test your Triggers, ensure that there are line(s) also added to the Artera Demo environment.
Important
If you want Artera to purchase a new line(s) instead of text-enabling an existing number, at no cost to you, then you do not need to create the new line(s) in Artera. Our Support Team will add the newly purchased line(s) to Artera for you.
Triggers will not send and staff will not be able to send or receive messages until the line is activated by Artera.
DeleteStep 3: Submit New Lines and Resources request to Artera Support
Create a new Lines and Resources Request to map your Locations and Providers to the new Artera Practice, and activate a new phone number. In the request form, follow the prompts to Add a New Location to an Artera Practice.
You will need the Location IDs (use the same ID from your EMR that is used in your Artera integration channel), Names, Addresses, Phone Number(s), and the Name(s) of the new Artera Practice. Read more about Adding a New Location to an Artera Practice.
3a. Sign Letter of Authorization (LOA)
You will receive an email from a member of the Artera Support team via HelloSign with a Hosted SMS Letter of Authorization that needs to be reviewed and signed before Artera can text-enable the requested numbers. It can take up to 2 weeks for the requested numbers to be text-enabled by Artera.

Location Mapping Complete
Once you have received confirmation that your Location(s) have been mapped to your new Artera Practice and your Future Appointment Load has been processed, you can complete the following steps, starting with verifying Resources display in the Practice.
3b. Verify that Resources Display in the New Practice
Confirm Resources (Providers and Locations) are displaying in the new Practice in your Production environment. These will only display in Artera after the Locations are mapped and the Future Appointment Load is complete.
- In your Artera Production environment, select the new Practice.
-
Navigate to Settings > Practice Settings > Resources.

- Review the list of Providers and Locations to ensure they are correct and edit the Resource, if necessary. Click here to learn how to edit or disable Resources.
3c. Verify that Events Display in the New Practice
Confirm that Events are displaying correctly in the Practice. These will only display in Artera after the Locations are mapped and the Future Appointment Load is complete.
- In your Artera Production environment, select the new Practice.
-
Navigate to Settings > Practice Settings > Events.

- Review the list of Events to ensure they are correct and edit the Events, if necessary. Click here to learn how to edit or disable Events.
Step 4: Configure Triggers
Determine whether you want to modify existing Triggers to include the new Practice, create new Triggers specific to this Practice, or a combination of both. Click here to learn about Triggers.
NOTE: Triggers are only accessible by Enterprise Users.
Step 5: Add Resources to New Lines
Ensure each line has at least one associated Resource. This can be completed before Artera has completed the line activation process.
In your Artera Production environment, select the new Practice.
Navigate to Settings > Practice Settings > Lines.
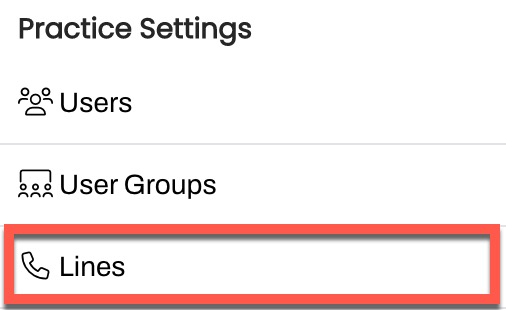
-
Use the line's (...) Actions menu to select Edit Line.

Select the Resources to associate with the line. Most customers associate lines with Locations and configure their Triggers to use the Location Resource. For example, an Appointment Trigger will automatically send from the line linked to the Location Resource where the patient is scheduled.

Select Save Line Select and repeat for any other new lines in the Practice.
Step 6: Configure Practice Settings
6a. Add Users to the Practice
Add Staff and Manager users to the Practice. Click here to learn more about adding users.
6b. Review Practice Settings
Review and update your Practice Settings, as needed.
NOTE: Your settings will vary depending on whether you are implementing Conversational Messaging at this Practice.
Conversational Messaging Recommendations
Configure your Practice Hours and After-Hours Auto Response. If you have more than one line and the lines have different operational hours, you can configure this information at the line-level instead.
One-Way Messaging Recommendations
Configure your Practice Settings to meet your organization's needs for Appointment Reminders only.
Set up your Practice Setting Hours to Sunday-Saturday Open from 1:00 AM - 1:01 AM
Set up your After-Hours Auto-Response: "Hi this is {practiceName}, we are not actively monitoring texts at this time. Please call us at {wellPhone} for assistance. Thank you!"
Add additional languages, if supported by your integration.
6c. Review Practice Holiday Hours
Configure Practice Holiday Hours if this Practice follows different Holiday Hours than what was set up at the Enterprise-level.
Delete